Прво да се захвалим свима који су се придружили мом малом блогу, на лијепим коментарима и охрабрењу и зато што чините да овај блог заживи. Иако сам добила похвале за пријашњи изглед блога (хвала, Стефане!), морала сам да направим измјене због боље функционалности оваквог блога.
А сада бурме!
First of all, I would like to thank you all for joining my blog, for your lovely comments and encouragement. Thanks for making this blog alive.
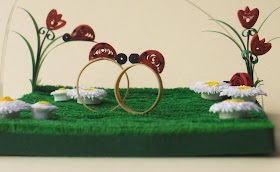
And now, the wedding rings!

Травицу за овај рад сам сјецкала за вријеме СП у кошарци, ЕП у ватерполу, у паузама утакмица и , наравно, гледајући Нолета на USOpen-у. Схватићете колико сам била нервозна.
Ако немате, а сигурно немате, машиницу која сјецка траку под углом од 90 или 45 , онда морате, као и ја, ручно! За разлику од мог тате, који све то доживљава као мучење, мени то не представља проблем, нарочито ако у међувремену нађем добру радио станицу. Мом тати је, наравно, тешко да ме гледа док то радим па је, потпуно самоиницијативно, обећао да ће ми направити ту фамозну машиницу. Захваљујући његовој непресушној моћи импровизације и томе да је читав свој радни вијек провео мотајући опруге и конструисању алата за исте, нимало не сумњам у то и зато ћете ми опростити на овој малој реклами. Али, машиница...
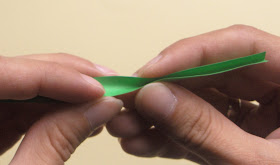
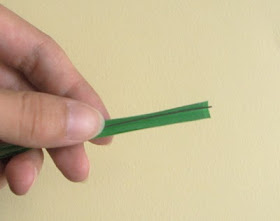
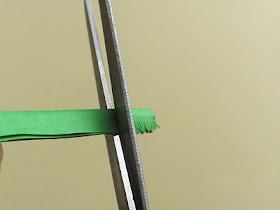
На брзину ћу показати како ја то радим. Видјела сам да се quiller-и сналазе на разне начине, али овај је за мене најбољи. Имам жицу ø0.2mm коју ставим између двије пресавијене траке. Ширина ових трака је 10mm. Никада раније нисам пратила колико утрошим папира за честитку или слику али за потребе овог блога сам почела да обраћам пажњу и сама сам се изненадила кад сам видјела да сам за основу 70mm x 70mm употријебила скоро 6000mm траке. Ипак ће ми та машиница добро доћи!
I've been cutting this grass during time off's of the WC in basketball, EC in water polo and, of course, waiting and watching Nole in USOpen. You'll understand how nervous I was.
If you don't have, and I bet you don't, fringing machine ( an angle of 90 or 45 degrees ), than you have to do it manualy, just like I do. Unlike my dad, who thinks that I'm torturing myself while doing this, I really don't mind at all, especially if I find a good radio station. So, he promised, totally initiative, to make me this famous machine ( out of two). Thanks to his ability to improvise and the fact that he dedicated all his life experience rolling, making springs and constructing tools for springs, there is no room for doubt. You'll forgive me on this little promotion , but the machine...
I'll show you the way I still do it. I saw many ways quillers do this fringing but this one is the best for me. I have a wire 0.2mm I put between two folded strips of paper ( this one is 10mm width ).For the purposes of this blog, I started paying attention on amount of paper I use for certain works. I was really surprised when I realized that I fringed almost 6m ( 236in approx) for this grass base ( 70mm x 70mm ). I definitly need that machine!
Лептире сам залијепила на провидну фолију за фотографије, мало је савила иглом и јачим љепилом причврстила за основу. При најмањем покрету који направите, лептирићи се помјерају баш као да лете. Остало је класичан quilling.
I sticked butterflies on transparent foil, banded it a bit and glued it on the base with strong glue. At the slightest movement you make, the butterflies start to move, too, just like they're flying.
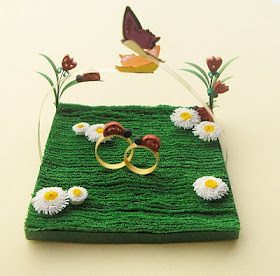
oh what a wonderful garden we have here! ^__^ it reminds me of alice in wonderland ;)
ReplyDeleteI love the ladybirds and the butterflies - it's a beautiful project! And the way you do fringing with a wire is a great idea, I must try it.
ReplyDeleteThat is awesome!!! I loved the idea of rings and ladybirds on the preview, but when I opened the whole post and saw that you fringed the grass yourself... I'm out of words! It's a stunning work! And looks amazing! Way to go, girl, that's a wowzer!!!
ReplyDeleteThanks for showing how you fringe the strips. Love the grass, beautiful.
ReplyDeleteСпасибо большое-большое за вашу красоту и пояснения!
ReplyDeleteThank you all so much for your lovely comments!!!
ReplyDeletePlease, do try, you'll see how easy it is. You don't have to be afraid that you'll cut the stripe where shouldn't be cut.
I'm really glad if I helped.
Спасибо!!!
beautiful and creative!!!lovely!
ReplyDeleteThanks, Nati!
ReplyDeleteSuzana,
ReplyDeleteMalo je reci da sam impresionirana idejama i vestinom koju posedujete.
Svaka cast!
This is amazing. The garden is so beautiful, with a whimsical fairytale feel to it. How do you get your ideas? =)It's just so amazing!
ReplyDelete@Aleksandra, mnogo znaci kada to kaze neko kao Vi!Hvala mnogo!
ReplyDelete@Yuenie, thank you! I'm glad you liked my work!Regards!
adorable! so much work, your poor fingers must hurt badly!
ReplyDelete